5 Steps to Tune-Up Your Classic Car
Provided by Hagerty
Today’s automobiles don’t require regular tune-ups like the cars of yore once needed. The electronic sensors and computers that regulate spark, timing, and fuel mixture are not maintenance items, although they do have to be replaced if they fail. And in today’s engines, spark plugs operate well for 100,000 miles or more. There are still filters to be replaced and components to be checked, but modern maintenance procedures are far different than what we old-timers remember.
Older cars need more attention on a more frequent basis. A typical owner’s manual for a 1950s car calls for a 10,000-mile that includes swapping out spark plugs, replacing points and condenser, and checking the carburetor idle mixture and ignition timing. In addition, recommended maintenance calls for oil changes every 2000 miles and regular lubrication of numerous components in the engine and chassis. With an older classic or an ancient beater, regular maintenance of ignition parts and filters is critical to smooth running and adequate power. Let’s walk through the process together.
Step 1: Swap out the spark plugs
To replace the spark plugs, carefully remove the plug wires and their insulating boots from each plug. If you think you’re not going to be able to tell which wire belongs to which plug, tag the wires. Inspect them: If you see deterioration of the insulating boots, or severe burns or cracking of the cables, replace them. Likewise, if the cables’ contacts are corroded to the point where they can’t be cleaned, replace the wires.
To remove the spark plugs, you’ll need a 3/8-inch drive ratchet and a spark plug socket. In most cases, a short extension allows better access. A ratchet with a flex head that can rotate to different angles can be helpful. A 5/8-inch or 16-mm hex socket will fit many plugs. Some Fords use plugs with a 9/16th-inch hex. A few European and Asian vehicles use 14mm plugs, and there are a few applications that use plugs with a 7/8-inch, 3/4-inch, or 18-mm hex. Most older American cars are fitted with plugs that have a 13/16-inch hex.
Some BMWs are equipped with plugs that require a thin-wall, 12-point, 14-mm socket for removal. Check the specs for your car before purchasing a tool.
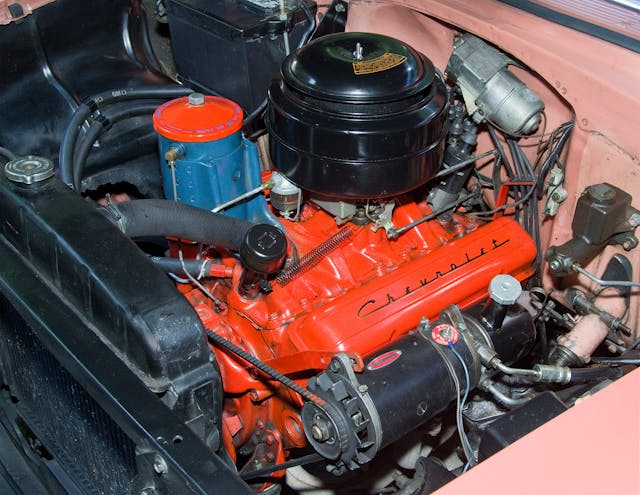
Once the spark plug is fully loosened, extract the magnet or a rubber sleeve inside that grips the plug (most cars have one or the other). On many cars, that combination of ratchet, socket, and short extension is all you’ll need, but on some models, it may not allow you to access all the plugs. My ’55 Chevy V-8 is equipped with a combination generator/power steering pump, and some left-bank plugs are best serviced from under the car with a 13/16-inch open-end wrench.
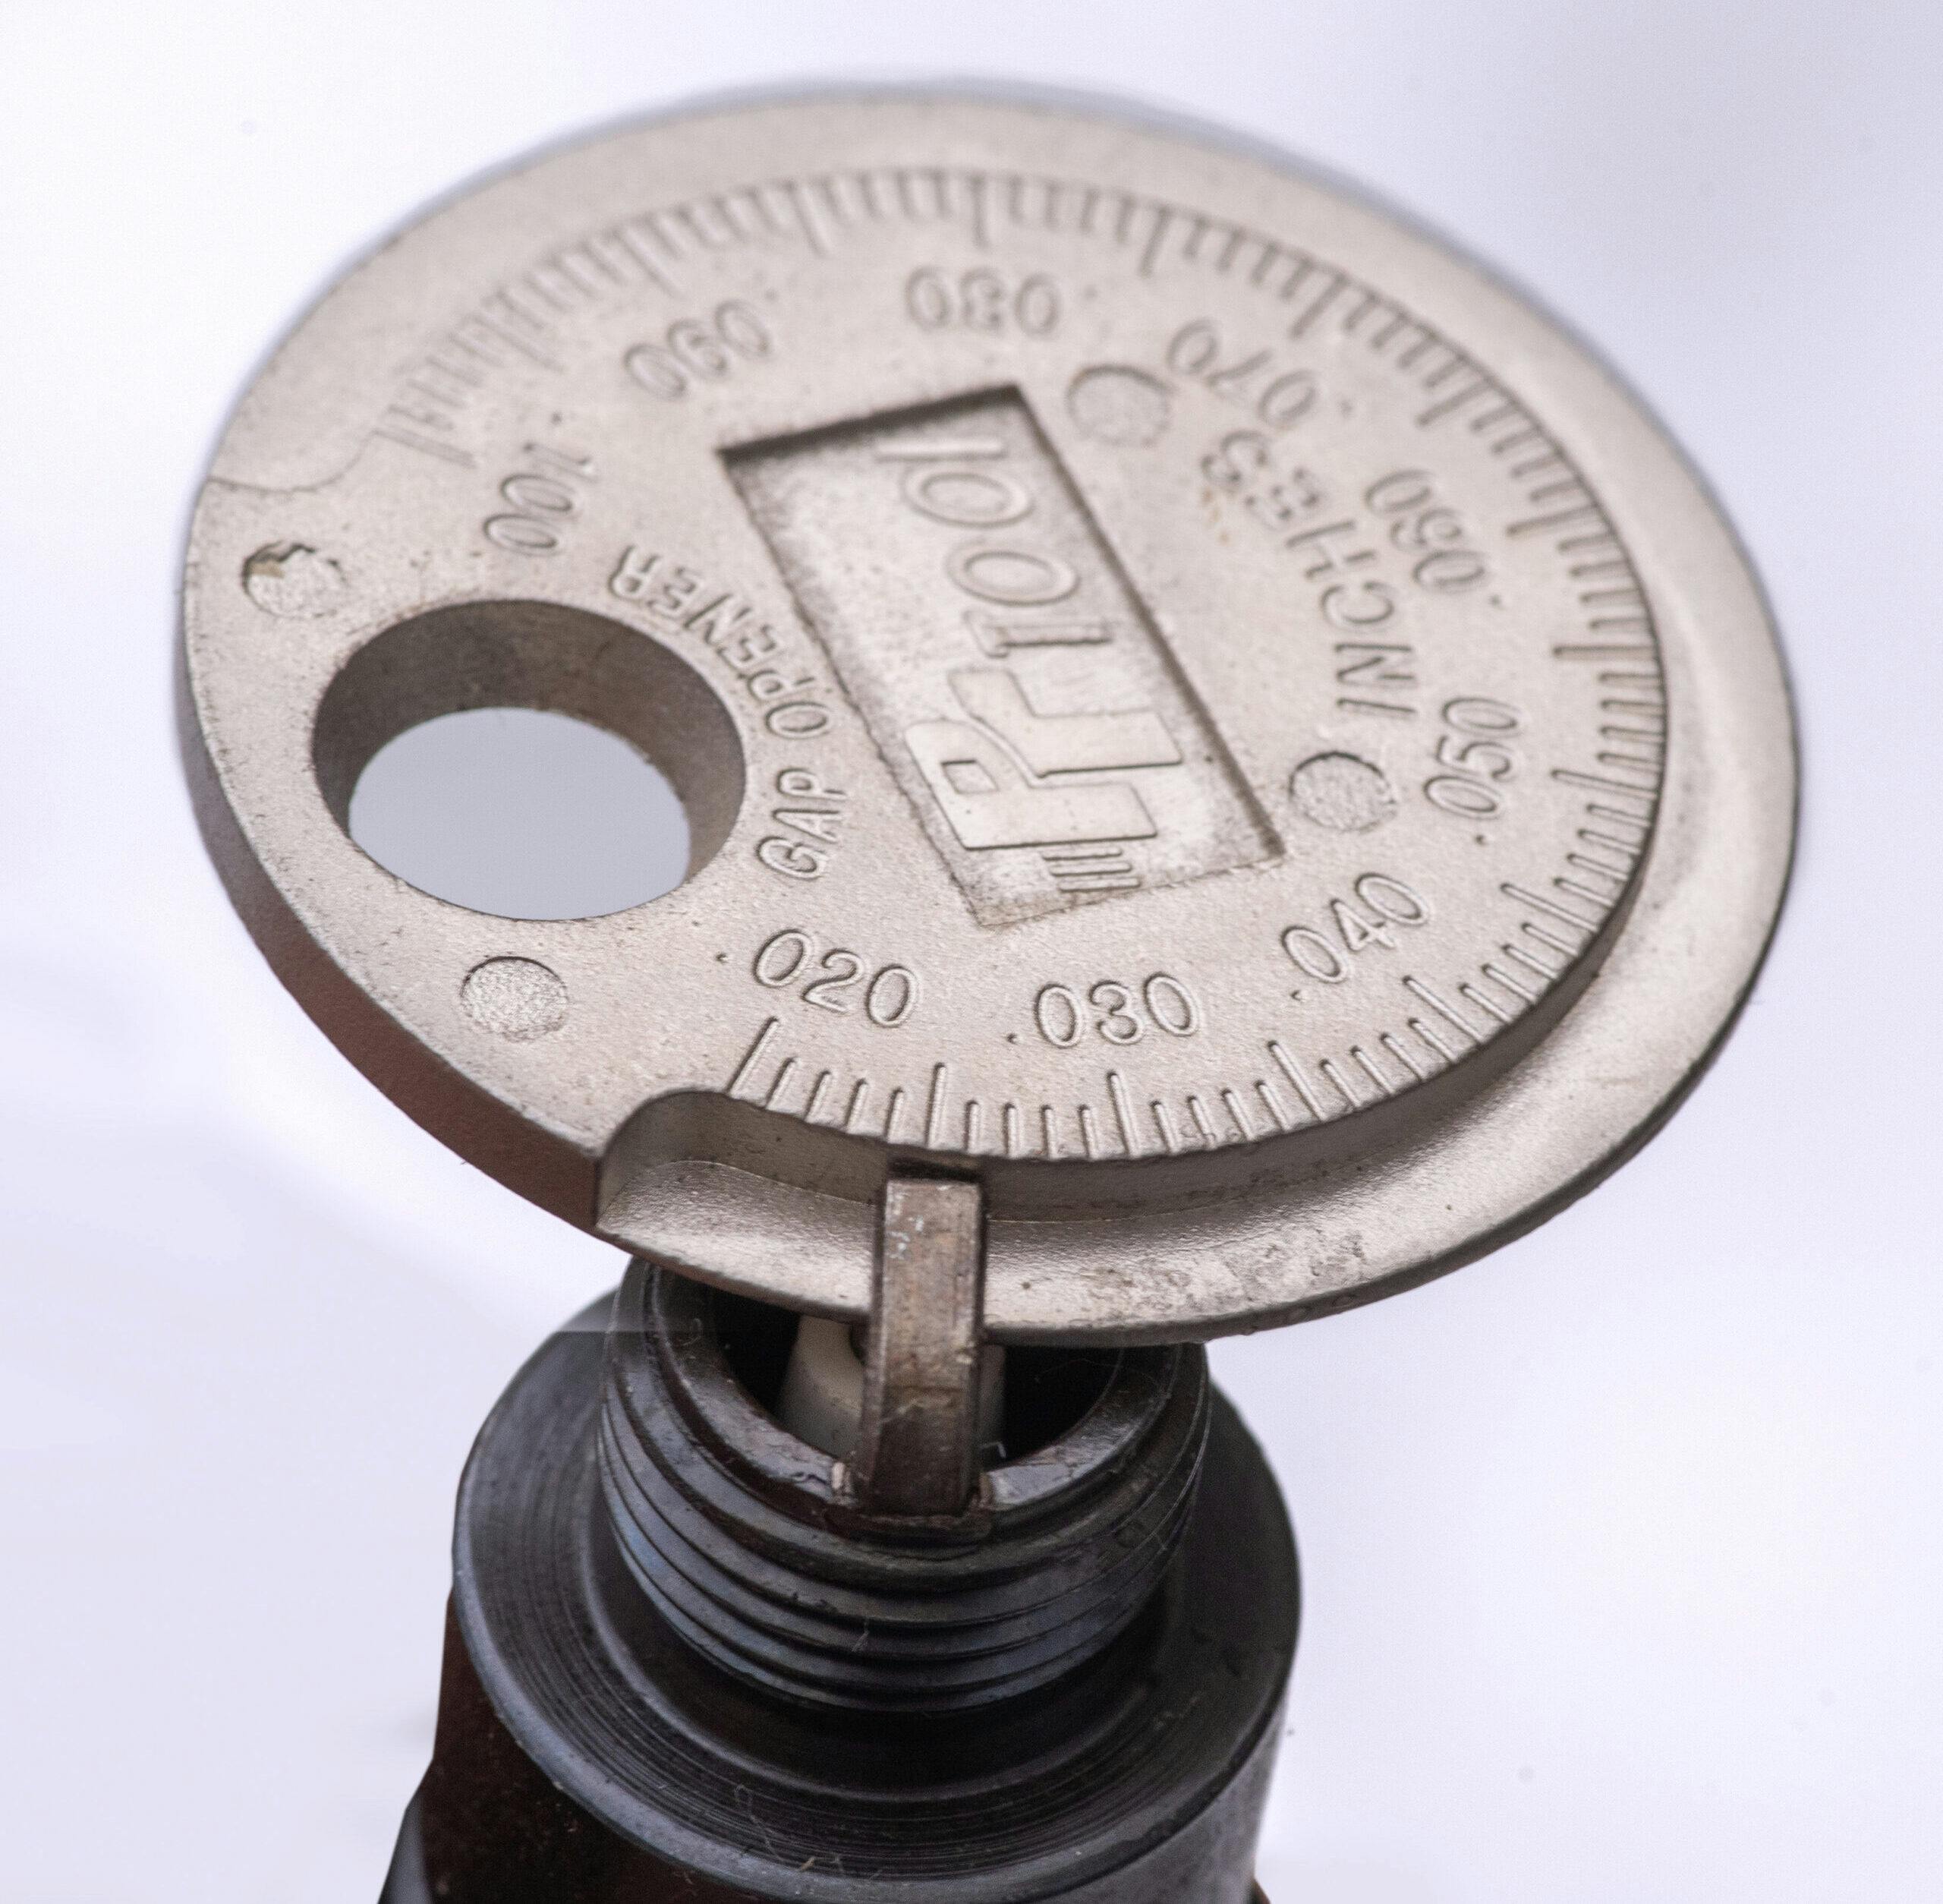
Before installing the new plugs, inspect them for damaged insulators or bent electrodes, then set the gap between the inner and outer electrodes. For most older vehicles with coil ignition, a gap of 0.025 inches is generally recommended. For even older vehicles with magneto ignition, the gap should be set to 0.020 inches. You can use a conventional feeler gauge to set the gap, but a round wire gauge is better. I have a tool that consists of a calibrated ramp of gradually increasing thickness. By sliding the plug along the ramp, the gap is easily measured. Your auto parts counterman may stock gapping tools as giveaway items. At the very least, they are inexpensive.
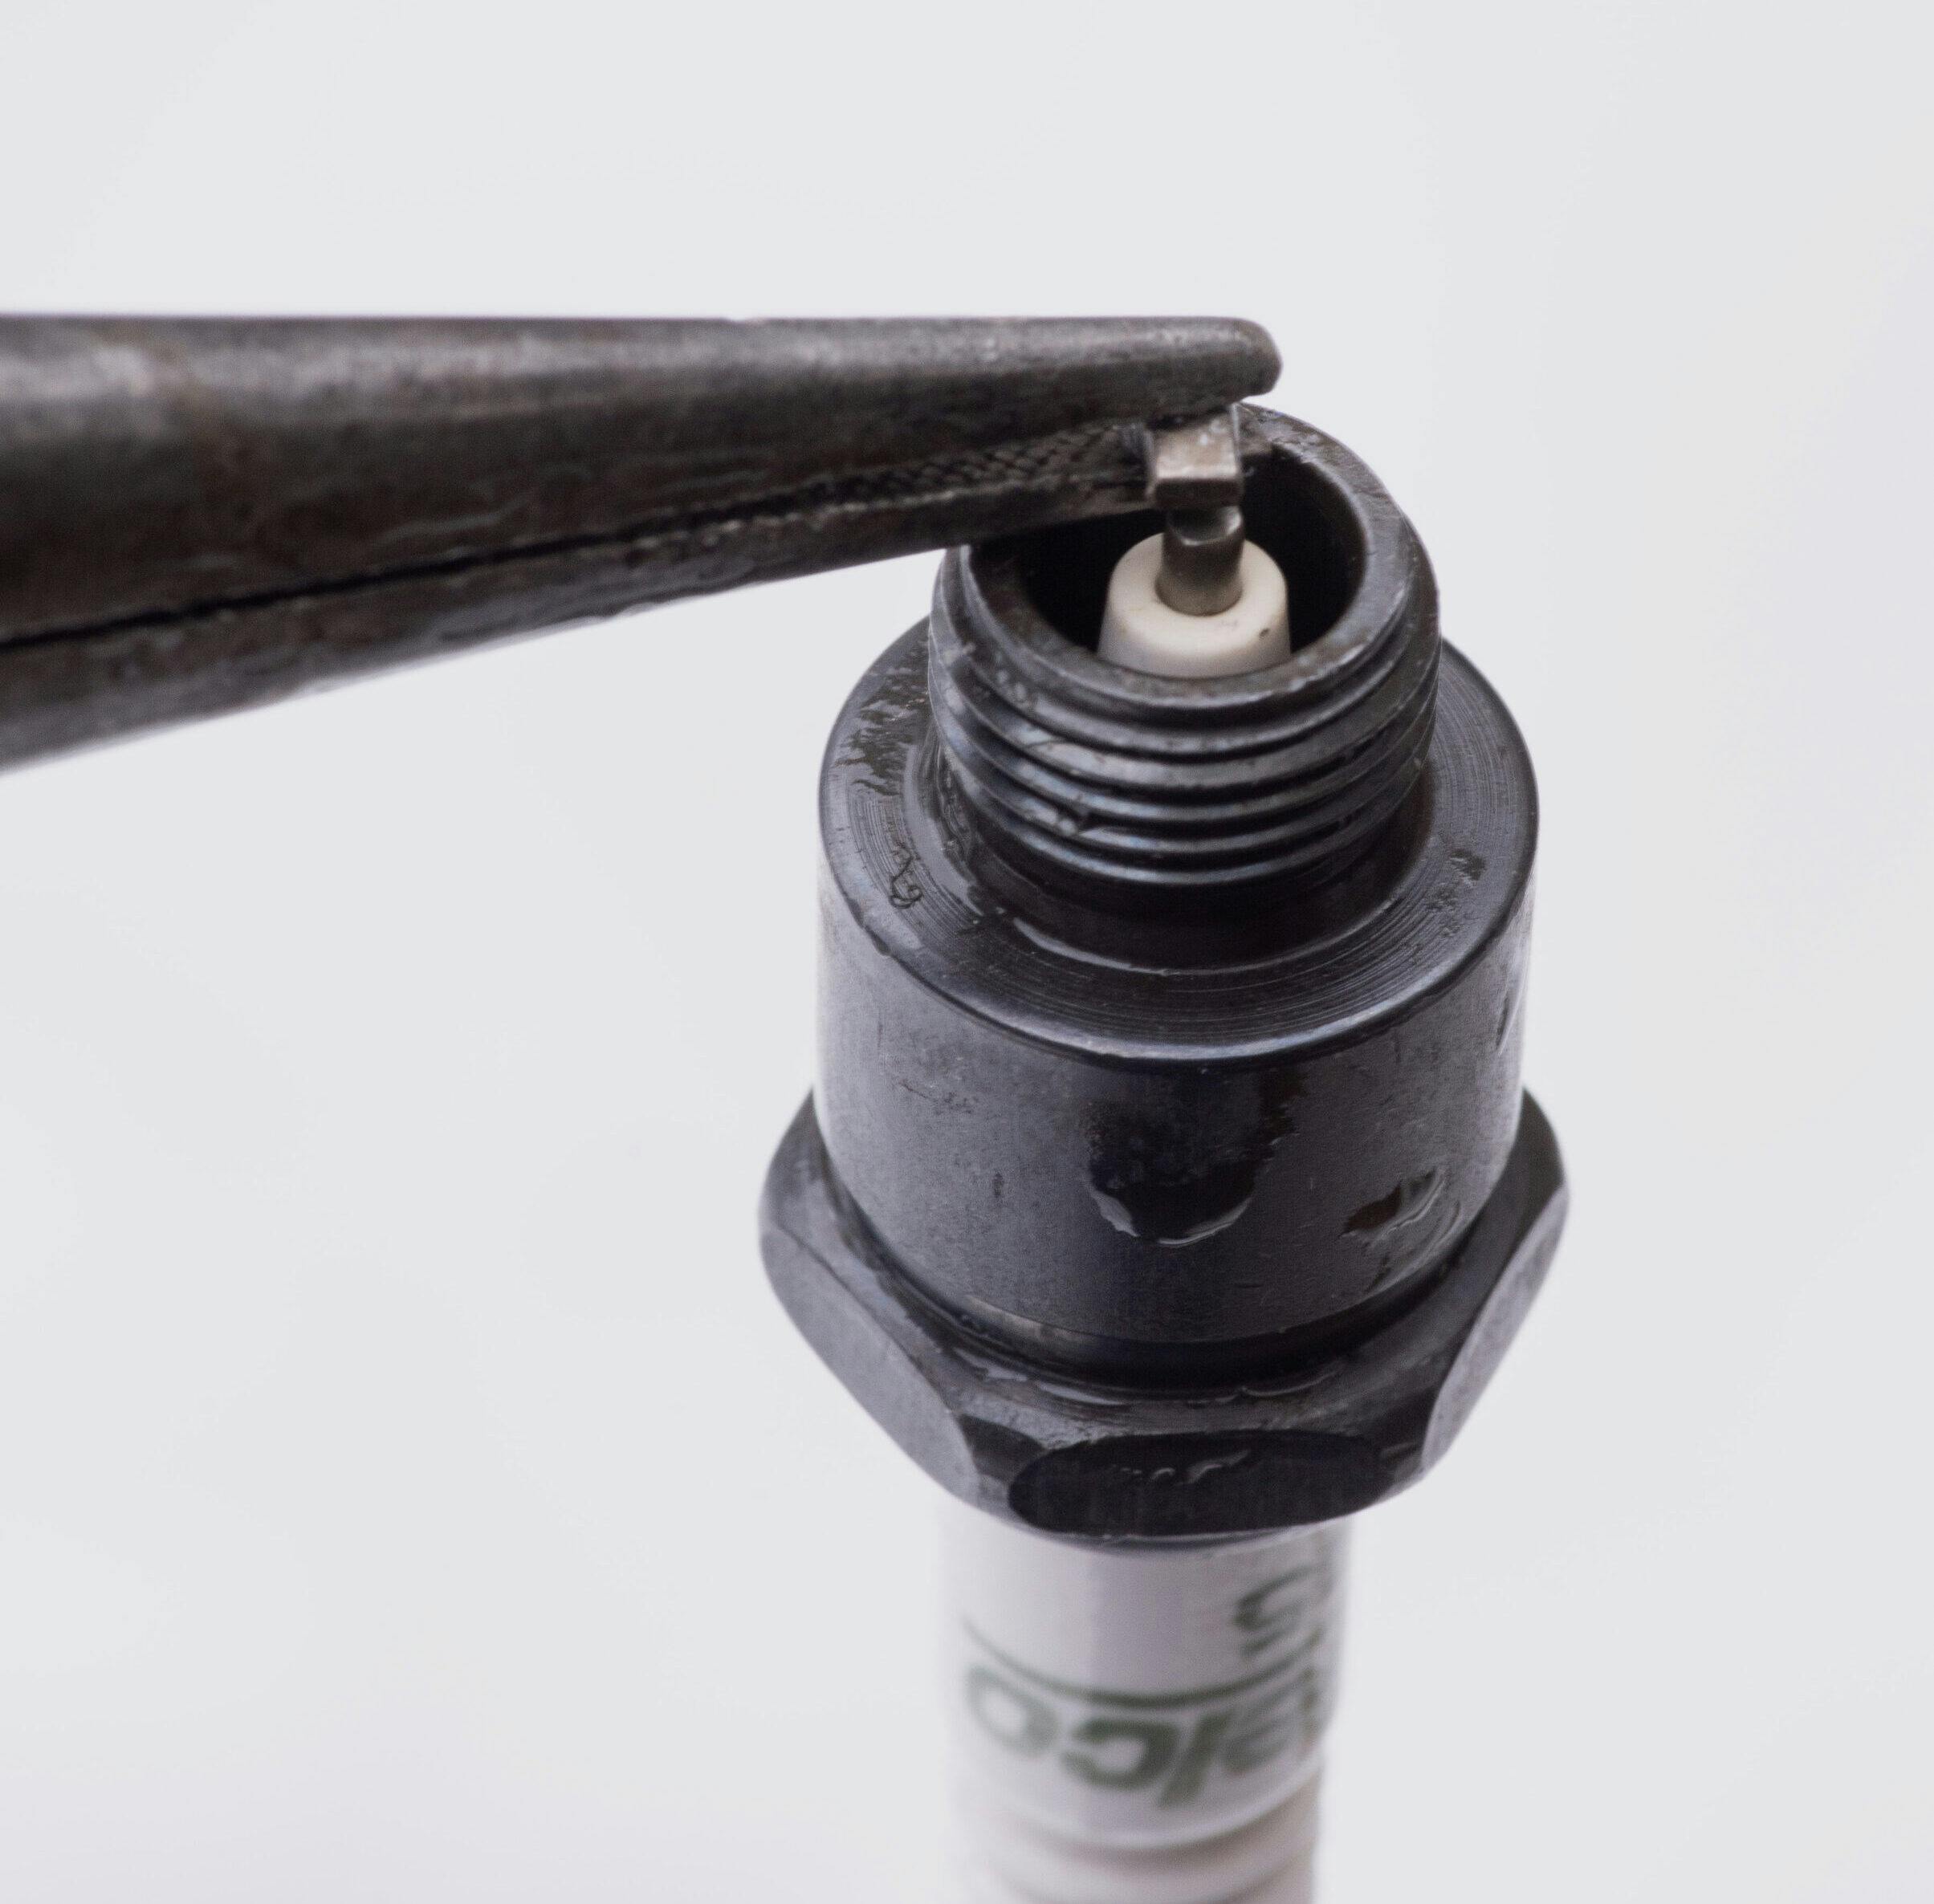
If you have to change the gap, carefully bend the outer electrode with needle-nose pliers or with the slot on the gapping tool. Don’t bang the electrode against a hard surface: You might crack the insulator, which can cause a short.
Some plugs come with the metal gasket installed. On others, you have to work it on over the threaded end. Place a small amount of dielectric grease on the plug threads and install them. Tighten moderately. If space permits the use of a torque wrench, torque them to 25 pounds. If you can’t use a torque wrench, screw the plugs in by hand until they seat, then tighten another half-turn with your wrench. It’s always best to start them by hand; there’s nothing like a cross-threaded spark plug to ruin your day.
Step 2: Service the distributor
The replacement and adjustment of distributor parts is fairly easy on many cars, as the distributor is mounted at either the side or at the front of the engine. Except on my ’55 Bel Air, in which the distributor at the rear of the engine and snug up against the firewall. One must either have really long arms or lie atop the engine to reach it.
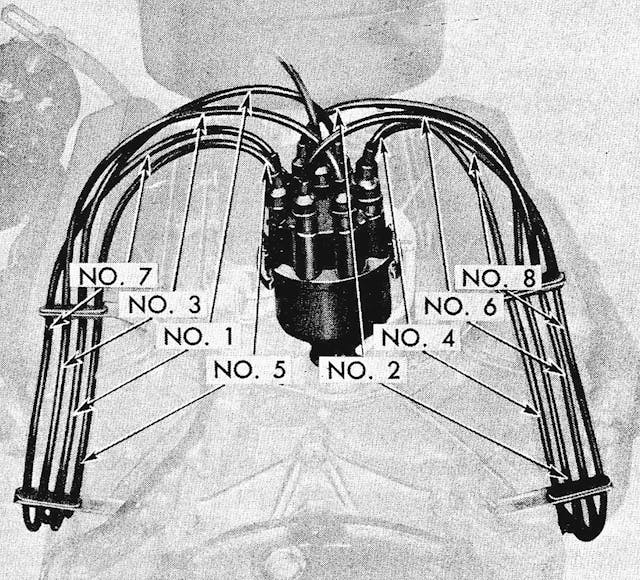
On some cars, the distributor cap can be removed with the spark plug wires attached. On my old Chevy that’s near impossible, as the wires are routed behind the engine, and there’s not much room for maneuvering. In any case, you’ll want to remove the wires from the cap at some point to check for corrosion or other damage. I mark the position of the number one cylinder’s wire in the cap, then pull all the wires out of the cap, wiggling each a bit as I tug on them so as not to damage the wire terminals. Armed with the firing order (1-8-4-3-6-5-7-2 for my Chevy) and the rotation (clockwise), it is easy to reinstall them correctly. But because the wires disappear behind the engine and under the exhaust manifolds before they arrive at the spark plugs, I number them as well, wrapping a short piece of masking tape with the cylinder number written on it around each wire.
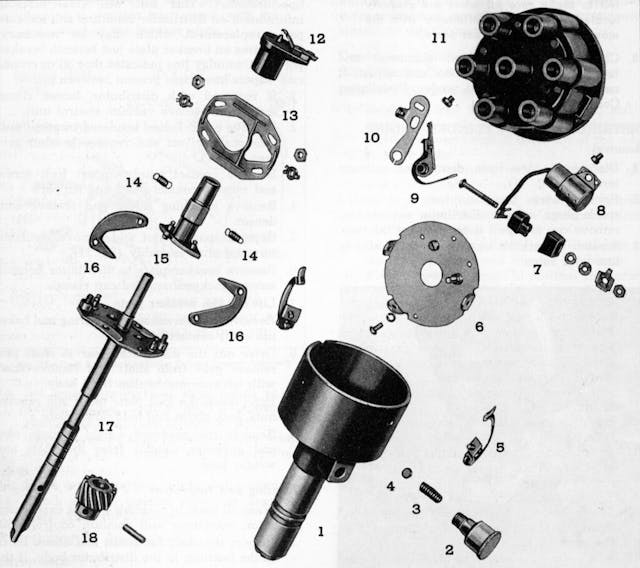
After removing the distributor cap, have a look inside. There you’ll see contacts that distribute voltage to the spark plugs for each of the cylinders. For example, the cap for an eight-cylinder engine has eight contacts evenly spaced within the circumference of the cap. If the contacts are badly corroded or if the cap is damaged, they should be replaced. The contacts will likely be mildly corroded. In that case, clean them with a small, sharp knife or similar tool.
Remove the rotor from the top of the distributor shaft. Check for corrosion on the conductor at the rotor’s outer edge. Mild corrosion can be removed with an emory cloth or small file. Severe corrosion that has caused pitting or loss of material is grounds for replacement.
Within the distributor, you’ll find the breaker points and condenser attached to the breaker plate with screws. While old-time service manuals suggest that points can be cleaned and readjusted if they are in fairly good condition, I replace them if I’ve already dug in this deep. Many distributor parts for older cars are still available from standard aftermarket sources, even for cars that are 70 or more years old. And they’re generally not very expensive: Breaker points for my ’55 Chevy, as listed in the East Coast Chevy parts catalog, sell for $15.00. Other distributor parts are equally inexpensive.
Ignition parts for less common cars may be harder to find. But suppliers who specialize in servicing classics and exotics should have them. Of course, you may pay considerably more. Ignition points for a Ferrari 250 GTO are $53.50 from awitalian.com.
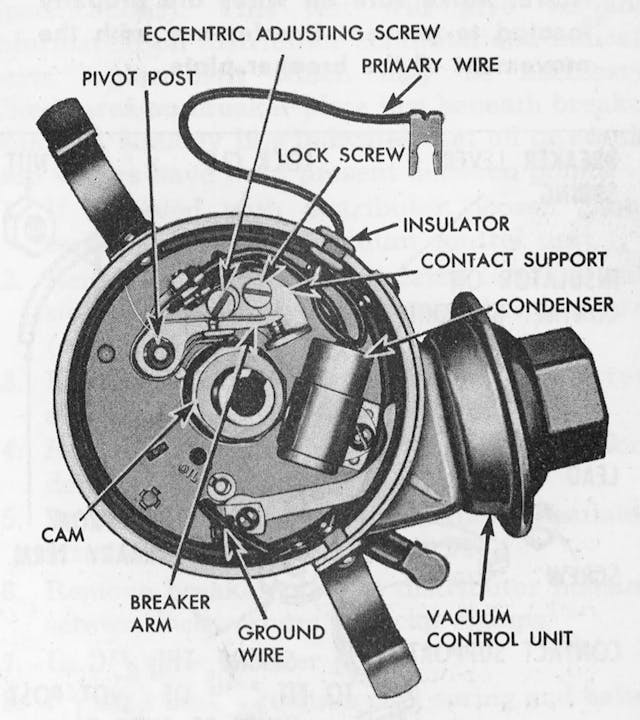
The breaker points are attached to the distributor breaker plate with one or two screws. You might also find an eccentric adjusting screw that can close or open the point gap when it’s turned with the locking screw loosened. Be careful removing the screws, as they’re small and it’s easy to drop them.
On most systems, the condenser is wired to the breaker points via a screw terminal and is held in a bracket that is attached to the breaker plate with one screw. The points and condenser can usually be removed together.

Before installing new points and condenser, apply a very small amount of dielectric grease to the distributor shaft cam. Install the points and condenser. Some points are adjusted with a slotted screw hole in the breaker point assembly that enables adjustment of the installation position. The points on most 1957 to 1974 GM cars are adjusted using an 1/8-inch Allen socket adjustment screw that can be accessed with the distributor cap removed, or through a sliding metal window in the cap. Thus, on these models, final adjustment of the points can be completed with a dwell meter after reassembly. But whichever type of breaker point adjustment you’re dealing with, it’s important to set the air gap before buttoning things up, even if you intend to fine-tune the adjustment with a dwell meter after starting the car.
The breaker points are fitted with a cam follower that rides on the distributor cam. To adjust the air gap, crank the engine until the cam follower is on a peak of the cam. Then adjust the gap to 0.015 inches by moving the breaker point assembly in or out before tightening the screw or screws that lock it in place. On those GM cars with the Allen adjustment, just turn the Allen screw until the correct air gap is achieved.
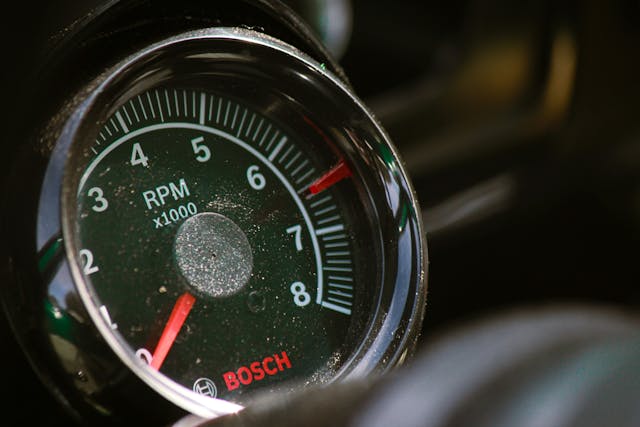
Install the rotor, cap, and plug wires. Then, if you have a dwell meter, attach its black lead to ground and its green lead to the negative terminal on the coil or as directed by the instructions for your meter. Dwell is the number of degrees of rotation that the points remain closed. Start the engine. You should see a reading of about 30 degrees dwell for V-8 engines. A degree or two in either direction is okay. A six- or four-cylinder engine will be happiest with a couple of degrees more dwell.
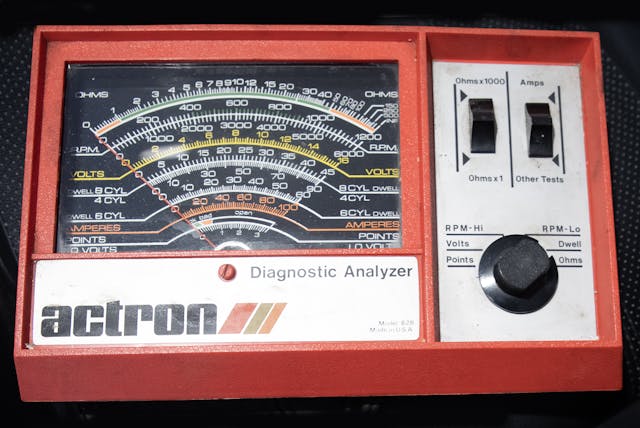
If dwell is not correct, you will have to readjust the points. If you are working on a ’57 to ’74 GM car, you can adjust the dwell while the engine is running by turning the 1/8-inch Allen screw, accessed through the metal shutter in the distributor cap. For most other cars, remove the distributor cap and readjust the air gap, moving the breaker point assembly closer to the cam for less dwell and further away from the cam for more dwell. If dwell bounces around more than a degree or two, the distributor shaft bearings are probably worn, and the distributor should be replaced.
Step 3: Check ignition timing
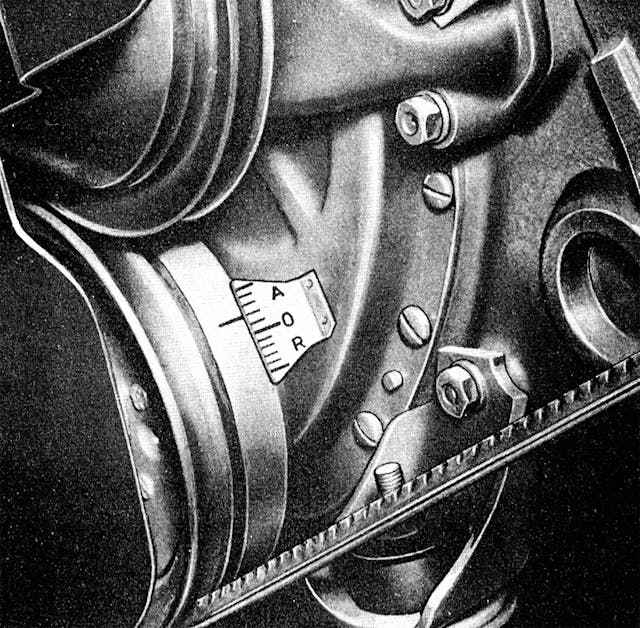
After installing new points, a check of ignition timing is necessary. Attach your timing light inductive lead to the number one spark-plug wire, and attach its black and red power leads to positive and negative contacts. Disconnect the vacuum advance and plug the vacuum line. On most cars, there will be a line on the harmonic balancer that indicates top dead center (TDC) for the number one cylinder. Behind the harmonic balancer, on the engine, there will be a degree scale. With timing light attached and engine running, aim that line at the degree scale. The flashing light will indicate how many degrees before top dead center the plug is firing. The spec for my Chevy is 8 degrees before top dead center (BTDC), which is indicated by four lines on the scale. With today’s higher octane fuels, I set it to 10 degrees BTDC.
Step 4: Replace filters
At minimum, your car probably has filters for air, oil, and fuel. Of course you should change your oil filter every time you change your oil. And for a classic car that is driven infrequently, oil change intervals should be 2000 miles or every two years.
Fuel filter intervals vary widely by filter type, and many classic owners who don’t put many miles on their car may never have to change it. But a good rule of thumb calls for replacing the fuel filter after 20,000 miles of driving.
Air filters made of paper or synthetic material should last at least 20,000 miles. Oil bath filters, like that on my ’55 Chevy, should be cleaned and refilled with oil at tune-up time. But the filter housing oil level should be checked every 1000 miles or so. I clean the wire mesh element of the oil bath in a solvent bucket and then blow it out gently with the air gun. I then douse the element with SAE 50 engine oil and fill the reservoir to the full indicator mark with the same oil. If temperatures are expected to remain below freezing for an extended time, I use SAE 20 oil. When servicing the oil bath air cleaner, I cover the areas of the engine around the carburetor with plastic drop cloths, because drips are inevitable.
Step 5: Adjust idle mixture
Before 1980 or so, carburetor idle mixture adjustment was an important part of a tuneup. Begin by setting the idle rpm using the adjustment screw on the carburetor throttle linkage. For my old ’55, GM recommends setting the rpm to 450 rpm. If you have a dwell meter, it probably doubles as a tachometer. A vacuum gauge will also be necessary to pinpoint the idle mixture setting.
With the vacuum gauge attached to a manifold vacuum port, turn the idle mix screw gradually in clockwise and/or counterclockwise direction until you find the spot where rpm peaks and the vacuum reading is highest. If that increases the idle rpm above the spec for your car (or what you’re comfortable with in terms of vehicle creep and smooth idle), reset the idle speed via the idle speed screw on the throttle linkage, and then recheck the mixture adjustment. If you’re unable to detect any difference in engine performance as a result of this procedure, you may have a vacuum leak or a bad carburetor.
If you don’t have a tachometer or vacuum gauge, you can probably get a good approximate idle mixture setting just by adjusting for what your ears tell you is the maximum engine speed. A lot of old timers set idle mix strictly by ear, made possible through lots of experience.
In every case, lots of experience is a mechanic’s best friend.